Tips and Tricks
Recommended Distros
We strongly recommend choosing a distro that has up-to-date packages and a solid maintenance reputation. The ones listed below tend to provide the best out-of-the-box compatibility with Star Citizen, but any up to date distro can work with varying degrees of effort.
- ⭐ Fedora
- Arch
- EndeavourOS (Arch-based, easier installation)
- openSUSE Tumbleweed
- ⭐ Bazzite (see note below)
- Ubuntu (only the latest release)
- Debian Testing
- Gentoo
Immutable Distros (ie. Bazzite)
Some immutable distros such as Bazzite come pre-configured with packages that can make it easier to get up and running (ie. Nvidia drivers). While initial setup may be much simpler, they generally limit your ability to tweak and customize the way the system operates. Installing software that isn’t already packaged for the OS can also be challenging.
A distro like Bazzite can be a good choice for Penguins who don’t need to tweak things beyond the default install, but be aware of its limitations.
Not recommended
- Debian Stable
- Ubuntu LTS
- Mint (based on Ubuntu LTS)
- Pop!_OS (based on Ubuntu LTS)
- Zorin (based on Ubuntu LTS)
- Drauger OS
- openSUSE Leap
- Manjaro
LTS Distros
LTS releases and out of date distros will likely require extra knowledge and effort to get Star Citizen running. Note that LTS ≠ stable in the traditional sense. LTS distros typically lock their packages to specific major versions which then only receive security updates. This is great for servers but problematic for gaming where new drivers, features, and fixes are important.
Gaming Distros
We do not recommend most gaming-focused distributions as many of our Penguins have had issues getting Star Citizen to run. They generally have only an individual or a very small team backing them and, at least where Star Citizen is concerned, don’t offer much benefit beyond our recommended distros for most Penguins.
Recommended Runners
- LUG Wine
- Default runner in the LUG Helper
- TKG Builds with LUG patches specifically for Star Citizen
lug-wine-tkg-git
Standard Wine built for maximum compatibilitylug-wine-tkg-staging-git
Wine plus experimental staging patches
- LUG Wine Experimental
- LUG Wine plus additional temporary/experimental fixes for documented issues which have yet to be properly fixed upstream.
- Please contribute to upstream reports/Issue Council reports if you need to use these runners! Our wiki will link to these where relevant.
- See Experimental Wayland for important caveats and workarounds for the experimental native winewayland runner
- RawFox
- Managed by the LUG Helper
How to add a Wine runner
- Select the option to
Manage Wine runnersin the LUG Helper and it will handle it for you. - Alternatively, to manually add a custom wine runner:
- Extract the archive to your runners folder. Restart your game launcher
- Heroic:
~/.config/heroic/tools/wine/ - Heroic flatpak:
~/.var/app/com.heroicgameslauncher.hgl/config/heroic/tools/wine/ - Wine:
~/Games/star-citizen/runners
- Heroic:
- Use the LUG Helper maintenance menu to edit sc-launch.sh to use the runner
 ################################################################
 # Configure the wine binaries to be used
 #
 # To use a custom wine runner, set the path to its bin directory
 # export wine_path="/path/to/custom/runner/bin"
 ################################################################
 export wine_path="/home/you-username-goes-here/Games/star-citizen/runners/wine-tkg-ntsync-git-10.3.r0.g3364df08cb6-327-x86_64/bin"
- Extract the archive to your runners folder. Restart your game launcher
How to Run the LUG Helper
If your distro is listed, install one of the community maintained packages and run it from your app launcher.
Alternatively, download the latest LUG Helper .tar.gz archive from git.
- Download and extract the .tar.gz archive
- To run
lug-helper.shfrom your file manager:- Navigate to the extracted lug-helper directory.
- Right click on
lug-helper.shand select Run as a Program.
- To run
lug-helper.shfrom a terminal:- Open your terminal and cd into the extracted lug-helper directory:
cd /path/to/extracted/lug-helper(List files with thelscommand) - Once you are in the directory containing lug-helper.sh, run it by typing:
./lug-helper.sh
- Open your terminal and cd into the extracted lug-helper directory:
The Helper uses Zenity for its optional GUI. If you don’t see the GUI and want it, install Zenity from your package manager.
How to edit the launch script
- Run the LUG Helper and select the
Maintenance and Troubleshootingmenu - Choose the option to
Edit launch script
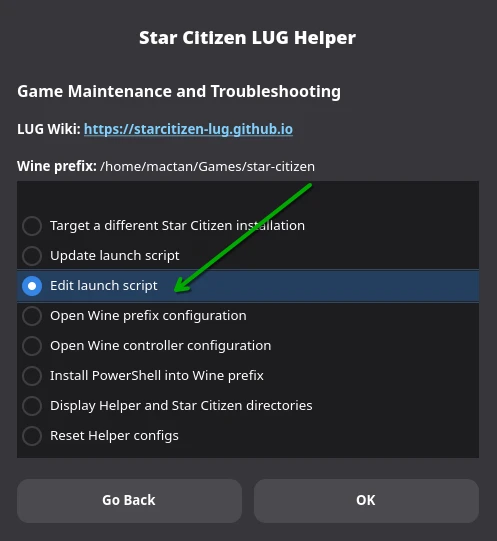
- Alternatively, locate the
sc-launch.shfile in your Wine prefix directory (by default,~/Games/star-citizen/sc-launch.sh) and open it for editing.############################################################################ # ENVIRONMENT VARIABLES ############################################################################ # Add additional environment variables to this section as needed below this line # Example: ########################################################################### export NEW_VARIABLE="value"
How to update the launch script
- Run the LUG Helper and select the
Maintenance and Troubleshootingmenu - Choose the option to
Update launch script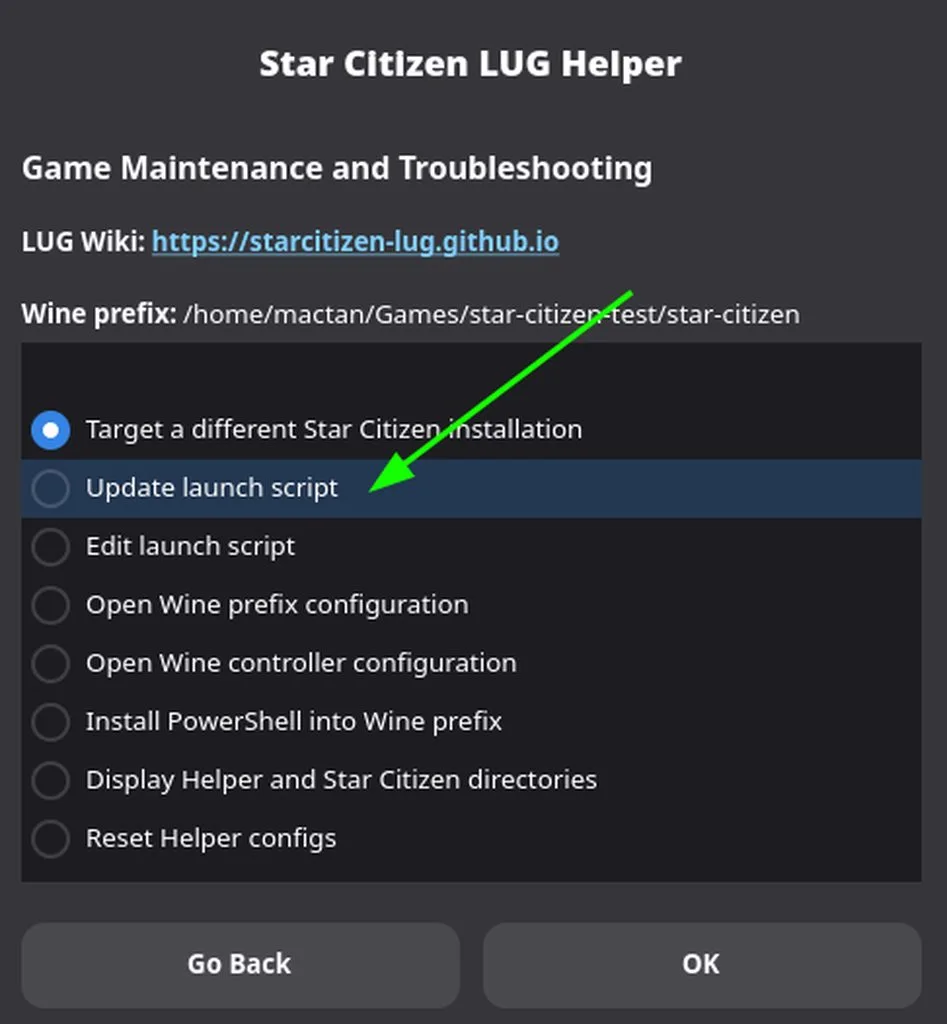
How to get a Wine maintenance shell using the launch script
- In a terminal, navigate to your Star Citizen wine prefix directory. By default, this is
~/Games/star-citizen - Verify that
sc-launch.shexists. - Run
./sc-launch.sh shellto enter a prepared shell environment for your prefix. All Wine prefix environment variables will be set for you. - Type
exitwhen done.
Where is my Wine prefix? Where is my LIVE/PTU directory?
- Run the LUG Helper and select the
Maintenance and Troubleshootingmenu. - Select the
Display Helper and Star Citizen directoriesoption. - Click on the relevant path to open it in your file manager.
LIVE/PTU Directory
Click the
Star Citizen game directorylink to access your LIVE/PTU directory. By default, this will open:~/Games/star-citizen/drive_c/Program Files/Roberts Space Industries/StarCitizen
Move an existing install
- Locate your
star-citizengame directory - Move the entire
star-citizengame directory to where you want it to be - Use the LUG Helper maintenance menu to target the new location
- Use the LUG Helper maintenance menu Update/Repair button
Updating DXVK Within a Wine Prefix
Use the LUG Helper’s Manage DXVK button
To downgrade dxvk to a previous version:
- Enter a Wine maintenance shell for your prefix using the
sc-launch.shscript. - Run
winetricks - Click “Select the default wineprefix” (verify that the file path in the title bar is your star-citizen game)
- Click “Install a Windows DLL or component”
- Select an older dxvk such as dxvk 2.6.1 or older and click OK
RSI Launcher Manual Update
- Using the latest LUG Helper, select
Maintenance and Troubleshootingthen chooseUpdate/Re-install RSI Launcher.
Console Variables
Below are some useful console variables. Tap the grave/backtick/tilde key (above tab) to open the console. See our troubleshooting page for non-US keyboards if you have trouble opening the console.
r_displayinfo[ 1, 2, 3, 0 ]- show fps and other details
r_displaysessioninfo[ 1, 0 ]- show session info QR code for reporting
r_displayframegraph[ 1, 0 ]- show chart of frame time
- MT (main thread)
- RT (render thread)
pl_pit.forceSoftwareCursor[ 1, 0 ]- force software cursor
USER.cfg
Varibles set using the in-game console must be reapplied each session. Create a USER.cfg file to apply the changes automatically each session.
- Use the LUG Helper to open your Star Citizen LIVE directory
- Create a text file named
USER.cfgin your LIVE directory - Copy the text block below into it
- Remove the
#symbol from the lines you want to use and configure as needed - Save then launch the game as normal. Any changes will be automatically applied
# Set to your game resolution
# r_width = 1920
# r_height = 1080

# Enable software cursor to workaround cursor warping - 0 = hardware cursor, 1 = software cursor
# pl_pit.forceSoftwareCursor = 1

# Enable borderless windowed mode - [ 0 = windowed, 1 = borderless, 2 = fullscreen ]
# r_WindowMode = 2

# Force game renderer - 0 = DX11, 1 = Vulkan
# r.graphicsRenderer = 0

# Enable in-game performance HUD - [ 1, 2, 3, 0 ]
# r_displayinfo = 1

# Limit frame rate
# sys_MaxFPS = 120
# sys_MaxIdleFPS = 120

# Toggle vsync - 0 = off, 1 = on
# r_VSync = 0

# Disable Temporal Super Resolution and all anti-aliasing
# r.TSR = 0

# Disable curved menus in VR
# r_StereoTheaterModeCanUseCylinder = 0
Easy Anti-Cheat
Check the latest news for any changes
Refer to the Easy Anti-Cheat page for troubleshooting steps
Wine Wayland
If the
Launch Gamebutton is unclickable in the launcher, or mouse clicks are not working in settings, the buttons may be offset. Resize the window to reset them, or useTab/Shift+TabandEnterto interact with them.Turn off any virtual keyboard. These conflict with the
Finteraction key and make the inner-thought menu appear to flicker.Nvidia Smooth Motion has been known to cause framerate issues or random freezes with Wine Wayland and may need to be disabled.
- Experimental Wine Wayland
- Use the LUG Helper to switch to LUG Wine Experimental Wayland.
For any other wine runners:
- Edit the launch script to modify environment variable
WINEDLLOVERRIDESand add to the end;winex11.drv=d
Example:export WINEDLLOVERRIDES="dxwebsetup.exe,dotNetFx45_Full_setup.exe,winemenubuilder.exe=d;winex11.drv=d" - If you experience a black or white RSI Launcher, add this RSI Launcher.exe argument
- Experimental Proton Wayland (for proton runners not wine)
- Add environment variable
PROTON_ENABLE_WAYLAND=1to your umu/proton enabled launcher
- Add environment variable
-
Set primary monitor, Edit the launch script to add environment variable
export WAYLANDDRV_PRIMARY_MONITORReplace the value for your monitor DP-1, DP-2, HDMI-A-1, etc
export WAYLANDDRV_PRIMARY_MONITOR=DP-1 -
Set resolution with USER.cfg
- Set DPI with LUG Helper Maintenance menu > Edit wine prefix configuration
Hide RSI Launcher Tray Icon
- Enter a Wine maintenance shell Use
wine regeditGUI to add registry key and DWORD value 1HKEY_LOCAL_MACHINE\Software\Microsoft\Windows\CurrentVersion\Policies\Explorer
NoTrayItemsDisplay= 1 - Enable “close-to-quit” in RSI Launcher settings
HDR (High Dynamic Range)
- Requires experimental native Wayland or Gamescope
- To enable HDR in native Wayland:
- Run
wayland-info | grep colorin a terminal. If you do not seewp_color_manager_v1then you will need to install VK_hdr_layer and add the environment variableexport ENABLE_HDR_WSI=1 - For Wine runners
- Add environment variable
export DXVK_HDR=1
- Add environment variable
- For Proton runners only (GE-Proton10-1 or newer)
- Add environment variable
export PROTON_ENABLE_HDR=1to your umu/proton enabled launcher
- Add environment variable
- Run
Gamescope
- Use the LUG Helper to edit your launch script
- Prepend your gamescope arguments to the launch line at the bottom of the launch script. For example:
gamescope --hdr-enabled -W 2560 -H 1440 --force-grab-cursor -- "$wine_path"/wine "C:\Program Files\Roberts Space Industries\RSI Launcher\RSI Launcher.exe" > "$launch_log" 2>&1 - Enable HDR with the argument
--hdr-enabled
Overlays
MangoHud
- Edit the launch script to enable environment variable
export MANGOHUD=1 - Remove the
#symbol from the start of the line - Refer to mangohud documentation for configuration examples and keybinds
- Create a config file named
$HOME/.config/MangoHud/wine-StarCitizen.conf
DXVK Hud
- Edit the launch script to enable environment variable
export DXVK_HUD=fps,compiler - Remove the
#symbol from the start of the line - Rever to DXVK documentation for configuration examples
Pre-launch and Post-exit Scripts
The launch script installed by the LUG Helper can be modified to run pre-launch and post-exit scripts. These scripts can be used to launch utilities like antimicrox, opentrack, etc., or disable/re-enable mouse acceleration for more precise FPS handling.
This can be inserted into the launch script above the “Launch the game” section:
sc-launch.sh
#############################################
# Run optional prelaunch and postexit scripts
#############################################
# To use create the scripts with your desired actions in them and
# place them in your prefix directory: sc-prelaunch.sh and sc-postexit.sh

# Run the prelaunch script
"$WINEPREFIX/sc-prelaunch.sh"

# Run the post-exit script on exit
trap "\"$WINEPREFIX\"/sc-postexit.sh" EXIT
Some example pre/post launch scripts:
Don’t forget to mark the scripts as executable!
sc-prelaunch.sh
#!/bin/bash
## Disable Mouse Acceleration

## GNOME
# gsettings set org.gnome.desktop.peripherals.mouse accel-profile flat

## KDE
# kwriteconfig5 --file "kcminputrc" --group "Mouse" --key "XLbInptAccelProfileFlat" true
sc-postexit.sh
#!/bin/bash
## Reset Mouse Acceleration

## Gnome
# gsettings set org.gnome.desktop.peripherals.mouse accel-profile default

## KDE
# kwriteconfig5 --file "kcminputrc" --group "Mouse" --key "XLbInptAccelProfileFlat" false
Third Party Mods
Use these mods at your own risk. Always inspect them for safety before using them.
StarStrings
Adds blueprint pools to contracts. After installation, a pre-launch script can be created to use wget to download the latest strings file. We recommend inspecting the file before using it for safety.